Beansandyoga

Practical, healthful eating and living.

Mix-ins for Oatmeal November 29, 2013

People tend to think oatmeal is a lot of trouble, but it can be made in big batches. Simply store your cooked oatmeal in the fridge and in the morning, scoop a serving into a bowl, top with milk, and heat it in the microwave.

Screen shot 2013-11-23 at 8.14.01 PMEven better, you can add your favorite toppings on the day you make the big batch, thus saving even more time in the morning. I prefer steel-cut oatmeal.

Here are some of my favorite mix-ins:

  • Cocoa nibs
  • Banana slices
  • Dehydrated strawberries (from Trader Joe’s)
  • Brown sugar
  • Honey
  • Ground flax seed
  • Grated or chopped fresh apple
  • Fresh or frozen blueberries, raspberries or blackberries. If you add them while the oatmeal is still hot, they’ll steam and cook a little, which helps them last longer.
  • Chopped dried apricots, blueberries or any dried fruit
  • Walnuts, pecans, ground almonds. Sometimes I even use pistachios!

How to make a batch of steel-cut oatmeal:

1 cup steel-cut oats

2 1/2 cups of water

dash of salt

I like to rinse my oatmeal before cooking it. I’m a gluten-free person, and this way any dust from other grains gets washed away. (Note, I am VERY diligent about the rinsing. I put the dry cup of oats in a deep bowl, cover with cold water and swish it around, then slowly pour the water out. The oats are heavy enough so that they don’t fall out of the bowl if you empty the water out gently. I repeat this about 20 times in order to feel confident that any gluten contaminants have been washed away. If you’re not concerned about gluten, maybe rinse the oats 2-3 times just to wash away dust.)

Put the oats, water and dash of salt into a heavy pot. Cover and bring to a boil. Once the water boils, turn down the heat and simmer for about 40-60 minutes. Sometimes I just turn off the heat after about 20 minutes, keep the pot covered, and let the pot sit until all the water has been absorbed.

Option 2: Use a rice cooker! So easy and the clean-up is easier, too. (Follow your rice cooker’s instructions.)


Sites I’m Grateful For November 22, 2013

Going gluten free is the best thing I’ve ever done. A lot of people mistakenly assume that it’s a health tip that anyone can try. I’ve learned that people who don’t truly get sick from gluten may miss out on key nutrients if they go gluten free. But for me, it’s not a choice. My body completely rejects gluten, every bit as much as a a body allergic to shellfish, or peanuts would.

Living gluten free is a lot of work. I cook almost all my own food. Travel is limited unless I have confidence that I can truly steer clear of gluten on the road. I carry my own emergency food stash with me where ever I go, even if it’s just out for errands.

I don’t know what I’d do without the bloggers below. They provide me with delicious recipes that are safe for me, and easy to make. They provide me with variety, and expertise, and their online sharing is a generous gift.

1. Elana’s Pantry

Homepage

The simplest gluten free recipes for breads, cookies and desserts that I’ve found. Lots of good tips on Paleo cooking. Her recipes always turn out and I get lots of compliments especially when I take them to a potluck.

2. Angela’s Kitchen

http://angelaskitchen.com

Angela is a busy mom with a gluten-free household to feed. She is organized and a genius with pre-prep. One of my favorites from her site is a tip to buy a month’s worth of chicken, then make three or four different marinades, divide the chicken among the marinades and then freeze until ready to bake. Quick, easy, nutritious meals. Much more tasty than store-bought any day.

3. David Lebovitz

Home

David Lebovitz is a professional chef based in Paris. He travels a lot and takes amazing photos of food markets, restaurants, dishes and his own cooking. Not every recipe he posts is within my range of skill or gluten free, but his guidance is inspiring and visiting his site like taking a little trip without leaving home. Both last year and this year he’s happened to provide naturally gluten-free cookie recipes just in time for the holidays. Last year it was a hazelnut cookie. This year it was almond-flour based amaretti. Both recipes were delicious, elegant and perfect for winter celebrations. I also love his ice cream recipes (I have an ice cream maker), and yes, there’s a part of me that wants to be an American chef in Paris, too.


Life Progress: Nutrition, Kohlrabi, Gluten Free Body November 8, 2013

KohlrabiI tried a new food today; kohlrabi. It was amazing. First, I sliced a tray full and roasted thin slices of kohlrabi in olive oil. But I still had a lot left. So then I made a cream of kohlrabi soup. Amazing.

Two things led up to this adventure.

The first is that I enrolled in a college nutrition course. This is THE best investment I have ever made in my health. After twenty-plus years of blank stares from doctors when I was first struggling with the symptoms of gluten sensitivity, not knowing the cause, and then another five years of blank stares after letting doctors know that I can’t handle gluten, I have made life-changing breakthroughs that solve a lot of mysteries.

Vitamin A for eyes? You need to eat things like carrots and butternut or acorn squash with a little fat, or else your body can’t absorb it. Noticed your eyesight deteriorating lately? You might want to try having a few extra carrots w/ olive-oil based salad dressing, or squash with a pat of butter on top.

One key variable I learned about is that if your body isn’t handling gluten, then the mechanisms that absorb all the other nutrients are essentially blocked, shut down, wilted, rendered useless with regard to absorbing other nutrients.

Had a few bloody noses lately? When you get a paper cut do you spout like a fountain? Vitamin K is essential to helping blood clot. It’s so essential that newborns get a shot of vitamin K right away when they’re born. If they didn’t get it, and got a minor cut, they could bleed to death. Go ahead, check it out.
That’s what my college nutrition book says, and I believe it. Why? Because unstoppable flowing blood has been around in my world for quite a while.

None of these things ever get connected when I talk to doctors. If there’s anything I’ve learned, it’s to be your own detective, and take charge of your own health.

So kohlrabi. The other motive behind kohlrabi is that I hear Lynn Rosetto Casper recommend it on a radio show this week. She gave some tips on how to use it: mashed with butter like potatoes, roasted, or in a cream based soup.

Finally, in my nutrition class, I learned that variety is key. I’m inclined to fall into ruts. I’ll eat the same thing everyday for months before I get sick of it. But my nutrition class encourages variety. Not just seasonally, but daily, too.

So I’ve started branching out. I’ve started taking risks. I’ve started bringing home one new fruit or vegetable from the store each week.

Since I’ve begun, I’ve discovered blackstrap molasses for calcium, cocoa nibs for antioxidants, increased my fish and flaxseed for omega-3s, and gone on a few adventures.

CREAM OF KOHLRABI SOUP

1 cup chopped onion
1-2 stalks of chopped celery
1 kohlrabi root, peeled and chopped into 1-2 inch chunks
2-3 tablespoons butter*
4 cups broth of your choice
1/4 cup corn starch
milk
salt and pepper to taste

Instructions
Melt a little butter in a soup pot. (Butter is making a comeback, it’s not as bad for you as was once thought.)

Saute the onion and celery for a few minutes.
Add the cornstarch and stir to make a roux. ( A pasty sort of mix of the butter and cornstarch. Cornstarch is gluten free. Most traditional recipes use wheat flour.)

Add the kohlrabi chunks. Cover and cook for about 5 minutes.

Add the broth and stir well to mix the broth with the butter/corn starch mixture.

Cover and heat until boiling. Turn down the heat and simmer for about 25 minutes.

Remove from heat and blend with an immersion blender, or in a regular blender. Please be careful with the hot liquids! You can let the soup cool a bit. It won’t hurt.

Once blended, return to the stove and add about 1-2 cups of milk or cream. (Remember, fat helps your body absorb the great nutrients in kohlrabi, which is a good source of Vitamin A. (That’s good for your eyesight!)

Heat until warm, but do not boil. Boiling ruins a cream-based soup, so I’m told by the “Joy of Cooking.”

Taste for seasonings. Maybe top with a little freshly ground pepper. Garnish with chopped green onion or parsely, if you like.

Hint: When you bring home fresh herbs, green onion or bunches of parsley, chop it all up right away and store it in a covered container in the fridge. It’s SO handy for adding to eggs, sauces, pizza, salad, you name it. Just do it. You’ll be glad.

*Butter — a lot of chefs will say that when making a milk based dish, butter enhances the flavor better than other options like olive oil. Suit yourself, but butter is making a comeback. It’s also a source of Vitamin D. Finally, stop and consider whether you feel full and more satisfied (thus eating less) when you eat something with a little normal, natural fat in it. I know I do.

That’s it!


Gluten free chocolate almond joy bars March 2, 2013

IMG_0578More than anything, I wanted a creative outlet today. One of my favorite things is to find a recipe for something I’ve never made before, get all the ingredients, then see how it turns out. Today’s new recipe is adapted  from one of my favorite gluten free blogs, Elana’s Pantry.

One thing I like about gluten free baked goods is that there’s usually a lot of protein in the mix. That means I’m full after one or two bites! An indulgence I can’t go overboard on because a few bites is all I want and need.

Note: this bar is not as sweet as a traditional cookie or candy bar. Feel free to add an extra teaspoon or two of sugar if you have a sweet tooth.

CHOCOLATE ALMOND JOY BARS (GLUTEN FREE)

  • 4 eggs
  • ¾ cup coconut milk (Coconut has healthy fats; I use regular instead of low fat. If you have any left over, it keeps well in either the fridge or freezer.)
  • 2 teaspoons almond extract
  • ¾ cup coconut sugar (or 1/2 cup regular sugar)
  • ½ cup blanched almond flour  (Trader Joe’s is a great source)
  • ½ cup coconut flour (Buy as much or as little as you like from the bulk flour bins at your local food coop.)
  • ¼ teaspoon salt
  • ½ teaspoon baking soda
  • ¼ cup unsweetened shredded coconut (might be hard to find in a traditional grocery store. Try Whole Foods or a food coop.)
  • ¾ cup chocolate chips
  1. In a large bowl, whisk together eggs, coconut milk, almond extract and sugar
  2. In a smaller bowl, combine almond flour, coconut flour, salt and baking soda
  3. Mix dry ingredients into wet with a handheld mixer
  4. Stir in ½ cup of the chocolate chips
  5. Grease an 8 x 8 inch baking dish
  6. Pour batter into dish, then sprinkle shredded coconut and remaining chocolate chips on top
  7. Bake at 350° for 30 minutes
  8. Cool for 1 hour
  9. Serve
 

Gluten-free chocolate chip scones February 2, 2013

choc chip scones

I am indebted to Elana Amsterdam, whose blog, Elana’s Pantry, has become my go-to source for easy, satisfying gluten-free recipes.

First of all, her recipes’ ingredient lists are usually short and simple. Whereas the typical gluten-free baked goods recipe from other sources requires multiple types of flour and expensive xanthan gum, Elana’s come out beautifully with usually one type of flour (often coconut or almond), mixed with a few eggs, shortening and natural sweeteners like honey or agave syrup.

It’s been the coldest week of the year in my wintry city. In need of a baked good for a potluck tomorrow, I pondered between two of Elana’s recipes. One was an almond-flour slightly sweet drop biscuit, the other was the recipe below for chocolate chip scones of coconut flour. Luckily, I had both types of flours on hand and had the luxury of deliberating. Since I hadn’t had a chance to try the chocolate chip scones yet, I succumbed to curiosity knowing that in case I didn’t like the way they turned out, I’d have a back up. Luckily, they were delicious and I am certain my potluck crew will love them! So easy that making a second batch was no trouble at all.

Note: The instructions reflect how I made these, which is slightly different than the instructions on Elana’s site.

Gluten-free Chocolate Chip Scones

  • ½ cup coconut flour
  • ¼ teaspoon sea salt
  • ¼ teaspoon baking soda
  • ¼ cup vegan shortening
  • ¼ cup honey
  • 4 large eggs
  • ½ cup (about 3 ounces) chocolate chips
    1. Combine coconut flour, salt and baking soda
    1. Mix in shortening, honey and eggs
    2. Fold in chocolate chips
    3. Scoop batter onto a parchment paper or silpat lined baking sheet
    4. Bake at 350° for 10-14 minutes
    5. Cool and serve
 

Easing into Autumn – Cheesy Lentil Hash August 29, 2011

After a June of cold rain and a July of sweltering humidity, we’ve finally got those ideal days of blue skies that are warm enough for shorts, but make you reach for long sleeves at night.  With great delight, I am pushing aside summer salads and grilling.  I am ready to be gently re-acquainted with my oven.  This recipe is one of my absolute favorites.

Filling, cheesy, high energy, and good if you’re craving something with a salty flavor, this is easy to whip up.  Enjoy with warm tortillas, tortilla chips or as a side to any dinner. It also packs well, and is a great bring-your-own lunch.

Nutrients: Red lentils are reported to contain fiber, folate, magnesium and iron.

CHEESY LENTIL HASH

1 vegetable bouillon cube or 2 teaspoons of granular bouillon

3 1/2 – 4 cups water

1/2 cup split red lentils (must be red, not green or brown.)

1 Tablespoon soy sauce. (Or Tamari, which is gluten free.)

1 large onion, finely chopped

2 celery stalks, finely sliced

2-3 cloves garlic, minced

2 Tablespoons tomato paste (Did you know you can freeze leftover tomato paste in a Ziplock bag?)

3 1/2 ounces extra sharp cheddar cheese, grated

Dissolve the bouillon cube in 3 1/2 cups boiling water. Stir well.  Add the lentils.  Bring to a boil again, then reduce the heat and let simmer for 15-20 minutes, adding more water if necessary, until all the liquid is absorbed and the lentils are soft.

Meanwhile, heat the soy sauce and 1/4 cup water in a saute’ pan.  Add the onions, celery, and garlic and saute’  for 8-10 minutes, or until soft.  Add the lentils and the tomato paste to the pan.  Heat, stirring, until piping hot.

Transfer to a baking dish and sprinkle with the cheese.  Heat under a hot broiler for about 2 minutes, until the cheese begins to melt.  Serve immediately.

Serves 4-6

Credit: This recipe is from “The High Energy Cookbook” by Rachael Anne Hill


Homemade Granola Bars April 11, 2011

Filed under: Easy food prep,Energy,Recipes,What I'm eating now — beansandyoga @ 2:12 pm
Tags: , , , ,

I’ve always been intimidated by recipes for homemade granola bars.  I was suspicious that they’d turn out hard.  Sometimes they called for ingredients I don’t like.  But the recipe below seems just right.  It’s flexible.  Any type of dried fruit or nut will do.  It’s easy to halve the recipe, or double it, if you like.  I admit my bars did not cut into perfect squares, but I was not deterred.  They crumbled a bit, but were moist and chewy.  It’s delightful on its own, or sprinkled over fresh fruit and plain yogurt

HOMEMADE GRANOLA BARS

    • 2 cups quick rolled oats
    • 1/2 cup packed light brown sugar
    • 1/4 cup almond flour or wheat germ
    • 1/2 teaspoon salt
    • 1/2 teaspoon ground cinnamon
    • 1 cup dried cranberries
    • 1 cup dried apricots, chopped
    • 1 cup nuts (walnuts, pecans, peanuts, sunflower seeds)
    • 1 teaspoon vanilla extract
    • 1/4 cup honey
    • 2 tablespoons maple syrup
    • 2 tablespoons vegetable oil

Directions

Preheat the oven to 350 F. Line a 9″ x 13″ pan with wax or parchment paper. Stir together the oats, brown sugar, almond flour, dried cranberries, apricots, nuts, salt, and cinnamon in large bowl, being sure to break up any clumps of sugar or dried fruit. Set aside.

In a smaller bowl, mix the honey, maple syrup, oil, and vanilla. Pour over the dry ingredients and mix well.

Pour the mixture into the prepared baking dish and bake for 30 minutes, or until the edges turn golden brown.

Remove from the oven and lift the wax or parchment paper from the pan. Let the granola slab cool for 5 minutes before removing the paper and cutting into bars.

Cool completely before eating or wrapping.

GLUTEN FREE: Be sure to buy oats from a plant that does not process wheat or other gluten containing products.  Do not use wheat germ.

Thank you to KitchenDaily.com for sharing this! (The above version is a slight modification of theirs.) http://www.kitchendaily.com/recipe/granola-bars-150114/#ixzz1JFKSXP2i
 

Marvelous Meusli June 13, 2010

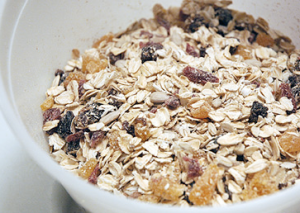
Some days, a girl needs to bypass the stove, bypass the cutting board, the microwave, you name it.  Some days, a girl needs instant gratification.  A bowl, cold milk, and the crunchy/sweet satisfaction of cereal.  But the truth is, I abandoned brand cereal years ago.  It was too expensive, too sugary, and the ingredients were too hard to pronounce.

It took trial and error, but I’ve finally rested upon a combination that cuts out wheat and barley (known sources of gluten*) without giving up traditional meusli attributes.

The beauty of this is that the dried fruit and nuts may be switched out as you like.   I started with a Trader Joe’s combination of dried mango, blueberries and cranberries.    For the next batch, there was naught but dried cranberries on hand.  Both were delicious!

HOME-MADE MEUSLI

2 cups of thin-rolled oats (slightly lighter and more thinly cut than regular rolled oats.)

1 cup oat bran

3/4 cup raw sunflower seeds

1/2 roasted slivered almonds

1 cup dried berries, raisins, or other dried fruit

Serve with milk, honey, a sprinkle of cinnamon, fresh berries or bananas, or sprinkle over yogurt.  Store in an airtight container.

*I realize that oats don’t always pass as gluten free.  Please double check with your gluten-free eaters to find out if they can tolerate oats.  Some say it depends on whether the oats were processed in a gluten-free facility.  (Oats are often processed in facilities that also process wheat, which can lead to being contaminated with gluten.)


Beat the heat: Curried Quinoa May 23, 2010

When it’s hot and humid, all I want to do is pull something easy out of the fridge. This salad can be made in big batches, and can accommodate all kinds of substitutions.  Originally, this recipe was for couscous.  Since I’m gluten-free, I’ve switched to quinoa.  This year, I started adding slices of steak to create a more protein-rich lunch on-the-go.  No Italian parsley? Cilantro works just fine.

CURRIED QUINOA SALAD

3 cups cooked quinoa or couscous ( 1 & 1/2 cups uncooked couscous or 3/4 cup uncooked quinoa)

1/4 cup plain yogurt

1/4 cup olive oil

1 teaspoon red wine vinegar

1 teaspoon curry powder (I like Penzey’s Maharajah curry powder.)

1/4 teaspoon ground turmeric

1  1/2 teaspoons kosher salt

1 teaspoon freshly ground black pepper

1/2 cup grated or small-diced carrots

1/2 cup minced Italian parsley

1/2 dried currents (white raisins, dried cranberries or a mix of dried berries are good substitutions.)

1/4 blanched, sliced almonds

2 scallions, thinly sliced (white and green parts)

1/4 cup small-diced red onion

Make the quinoa or couscous according to package directions.  Whisk together the yogurt, olive oil, vinegar, curry, turmeric, salt, and pepper.  Pour over the fluffed quinoa or couscous and mix well with a fork.  Add the carrots, parsley, currants, almonds, scallions and red onions; mix well and taste for seasonings.  Serve at room temperature.

Based on Ina Garten’s “Curried Couscous” in “The Barefoot Contessa Cookbook.”